


General
How to Set Up a DisplayLink-Based Docking Station: A Comprehensive Guide

Jul
In today’s fast-paced digital world, maximizing productivity is paramount. Whether you’re working from home, the office, or on the go, having a streamlined and efficient workstation can make all the difference. One of the best ways to achieve this is by using a DisplayLink-based docking station. These versatile devices allow you to connect multiple peripherals and displays to your laptop, transforming it into a powerful desktop setup. Here’s a step-by-step guide to setting up your DisplayLink-based docking station.
What is a DisplayLink-Based Docking Station?
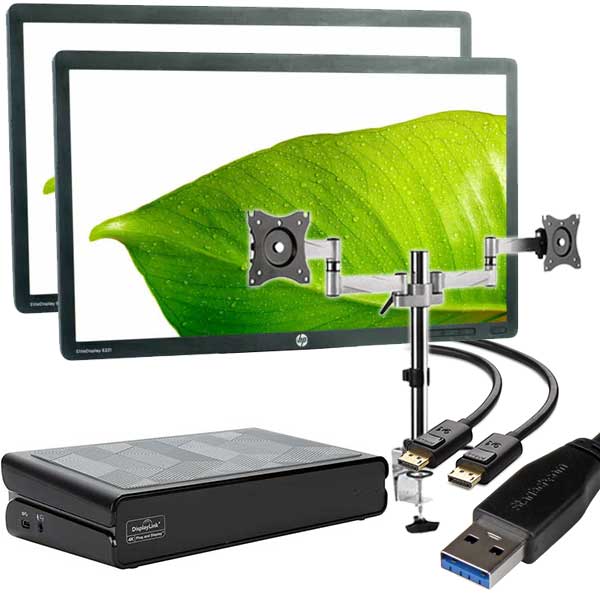
DisplayLink is a technology that allows multiple displays and peripherals to be connected to a single computer via USB. DisplayLink-based docking stations leverage this technology to provide a seamless and efficient way to expand your workspace. These docking stations typically offer various ports, including HDMI, DisplayPort, USB-A, USB-C, Ethernet, and audio jacks, allowing you to connect monitors, keyboards, mice, external drives, and more.
Benefits of Using a DisplayLink Docking Station
- Expandability: Connect multiple monitors and peripherals.
- Flexibility: Compatible with both Windows and macOS.
- Simplicity: Easy to set up and use, with plug-and-play functionality.
- Portability: Compact design makes it easy to carry and set up anywhere.
Setting Up Your DisplayLink Docking Station
Step 1: Unbox and Position Your Docking Station
Unbox your docking station and place it on your desk or desired workspace. Ensure that it is within reach of your laptop and power outlet.
Step 2: Connect the Docking Station to Power
Using the provided power adapter, connect your docking station to a power outlet. This step is crucial as it ensures that all connected devices receive sufficient power.
Step 3: Install DisplayLink Software
Before connecting your docking station to your laptop, you need to install the DisplayLink software. Visit the DisplayLink website, download the latest driver for your operating system, and follow the installation instructions.
- For Windows: DisplayLink Drivers for Windows
- For macOS: DisplayLink Drivers for macOS
Step 4: Connect the Docking Station to Your Laptop
Using a USB-A or USB-C cable (depending on your docking station and laptop compatibility), connect the docking station to your laptop. Your laptop should recognize the docking station and automatically start using the installed DisplayLink drivers.
Step 5: Connect Your Peripherals
Now, connect your monitors, keyboard, mouse, external drives, and any other peripherals to the docking station. Most DisplayLink docking stations support multiple monitors via HDMI, DisplayPort, or VGA. Make sure to use the appropriate cables and ports for your devices.
Step 6: Configure Your Display Settings
Once all peripherals are connected, configure your display settings. On Windows, right-click on the desktop and select “Display settings.” On macOS, go to “System Preferences” and then “Displays.” Arrange your monitors to match your physical setup and adjust the resolution and orientation as needed.
Step 7: Test Your Setup
Finally, test your setup to ensure everything is working correctly. Check that all connected peripherals are recognized and functioning properly. Test your internet connection if using an Ethernet cable, and ensure that your monitors are displaying correctly.
Troubleshooting Tips
- No Display: Ensure all cables are securely connected and the DisplayLink software is installed correctly.
- Peripheral Issues: Check that the docking station is receiving power and all drivers are up to date.
- Slow Performance: Disconnect and reconnect the docking station, or restart your laptop to resolve performance issues.
Conclusion
Setting up a DisplayLink-based docking station is a straightforward process that can significantly enhance your productivity. By following these steps, you can create a versatile and efficient workstation that meets all your needs. Whether you’re expanding your home office or optimizing your workspace on the go, a DisplayLink docking station is a valuable addition to your tech arsenal.
For more tips and tech guides, visit our NZ Laptop Wholesale Blog. Explore our range of professionally refurbished laptops, desktops, and monitors to complete your setup!